Folding@Home with Proxmox
Folding@Home with Proxmox
Welcome to my blog! This is my first post, and I’m not quite sure what the general theme of this blog is going to be. Tentatively, I’ll just use it as a place to talk about things that I’m working on and things that I find interesting from my job, my education, or my free time.
Obviously, COVID-19 has been an utter tragedy and a disaster for many people across the world. The sooner that scientists can develop effective vaccines and treatments, the better off we’ll all be, and the sooner we can return to some semblance of normalcy. Fortunately, you can contribute to this scientific endeavor in your own way, even if you aren’t a nurse, doctor, epidemiologist, or virologist. All you have to do are follow the steps outlined in this post, and you’ll be contributing to the search for cures and treatments, at very little cost to yourself, through the power of virtualization and the Folding@Home project. By allowing the Folding@Home project to use a little bit (or a lot, if you’re feeling generous) of your CPU time, you can buy us all a few more tickets to to the cure lottery than we had before. My interest in this project stemmed from the now-defunct 1990’s Search for Extraterrestrial Intelligence at Home (SETI@HOME) project. As cool as that was, Folding@Home’s mission is much more immediate.
Proxmox Virtual Environment
As a graduate assistant at the University of New Orleans, I was tasked with evaluating virtualization platforms for the department. I won’t get into the full details of virtualization here, but a simple summary is that virtualization allows you to run multiple guest operating systems on a single host machine. The first hypervisor that I ever had hands on experience with was Proxmox VE. Proxmox is based on Debian Linux, and uses the Kernel-based Virtual Machine (KVM) module to function as a type-1 hypervisor.
One of the nicest things about Proxmox is it’s ease-of-use, even for someone new to virtualization. Simply grab a Proxmox ISO, flash it to a USB drive using a tool like balena-etcher, and install it on a spare desktop computer that you have lying around your house. This computer will need to have a 64-bit processor that supports hardware virtualization, but most computers made in the last 6 years, and many before that, do. It will also need to have internet access, either through WiFi or ethernet.
Once you’ve navigated the installation process, and gone through the basic configuration steps, you’ll be ready to start spinning up your own VMs and containers through the Proxmox VE web interface. You can navigate to this via another computer on your home network, like your laptop, by visiting https://<proxmox_IP_address>:8006. The Proxmox IP address can be obtained via the command line on your Proxmox machine by running ip a.
Creating an LXC container
For our Folding@Home installation, we aren’t going to be using a full-fledged QEMU virtual machine. Instead, we’ll be running it inside of an LXC container based on Debian 10, a minimal Linux distribution. Containers can share a Linux kernel, preserving resources (primarily RAM) consumed by running multiple kernels on a single host machine. This container will run using Promox’s kernel, but with its binaries and libraries isolated.
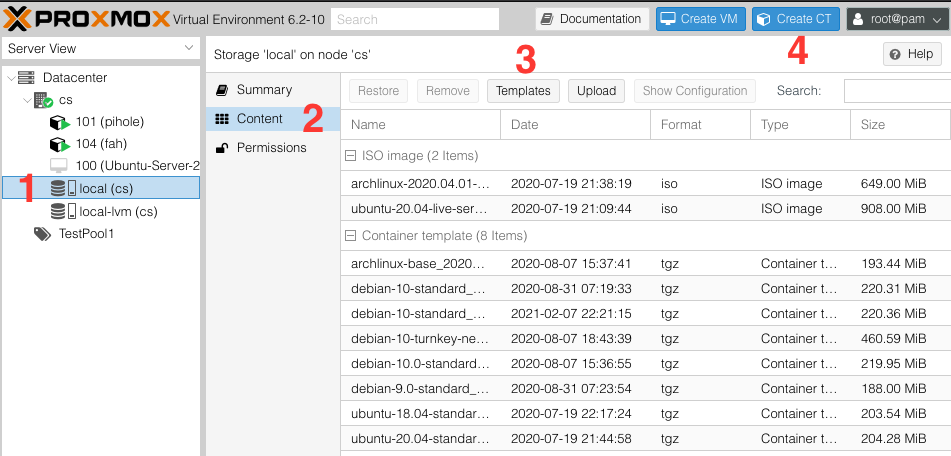
- Navigate to a storage resource in the leftmost pane.
- Select the ‘Content’ tab in the interior frame.
- Select the ‘Templates’ button near the top center of the frame. This will open up a list of LXC templates, which are worth exploring in more depth. In the
turnkeylinuxsection you can find premade images for a number of cool services that you can host from this computer. The beauty of virtualization is that it allows us to run a diverse set of services from a single hardware unit quite easily, without these separate installations conflicting or interfering with each other. For now, you can just selectdebian-10-standardfrom thesystemsection, and click download. Once you see in the output window that the download has finished, you can exit this window. - Click the ‘Create CT’ button at the top to begin the setup process for a new LXC container. You’ll need to set up at the very least a password, along with configuring this container’s CPU/Memory allowances, and network configurations. You’ll probably just want to use DHCP for obtaining an IP address, but you can of course configure a static IP if that’s your preference. Once you have things configured to your liking, press continue, and once the output screen displays
TASK OK, you can close the window.

Installing Folding@Home
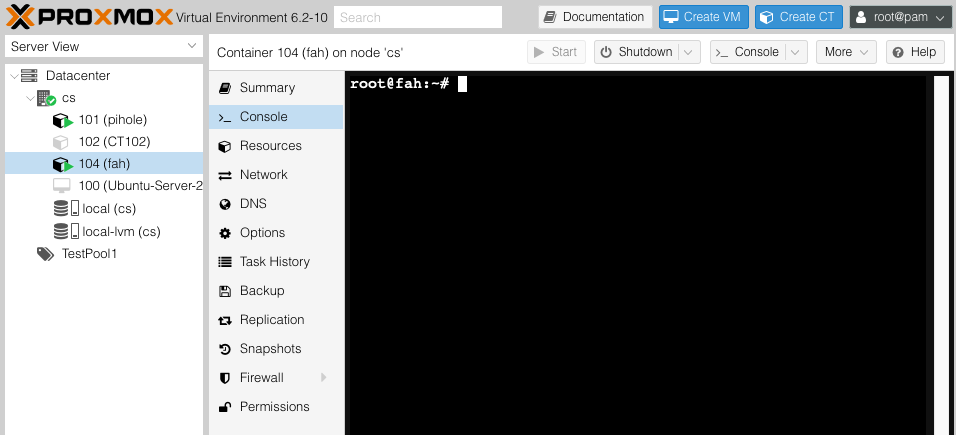
We’re finally at the last step: let’s install the Folding@Home packages, and start the necessary services. Actually, you don’t need to worry about starting the services; this is done automatically when the Debian packages are installed. Find your container in the list on the leftmost pane, select the console tab on the inner pane, and run the commands to download and install the Folding@Home debian packages.

Assuming nothing went wrong along the way, you are now officially contributing to the Folding@Home project! Your CPU is working on a small piece of the massive computations required to understand the ways in which proteins fold and interact. You can monitor the progress of the latest Folding@Home sprint at their homepage.

Conclusion
Thanks for sticking it out with me through this blog post. Every CPU cycle that you can spare makes a difference towards finding effective COVID-19 treatments, and hopefully, your interest in virtualization technologies has been piqued along the way! There are tons of different ways that you can use proxmox to host your own home ‘cloud’. I’d highly recommend looking into setting up a container to run Pi-Hole, which will provide ad and tracker blocking for your entire home network.